Exploring the World of Arduino: A Beginner's Guide
Arduino Platform
Arduino is an open-source electronics platform based on easy-to-use hardware and software. Arduino boards are able to read inputs - light on a sensor, a finger on a button, or a Twitter message - and turn it into an output - activating a motor, turning on an LED, publishing something online. You can tell your board what to do by sending a set of instructions to the microcontroller on the board. To do so you use the Arduino programming language (based on Wiring), and the Arduino Software (IDE), based on Processing

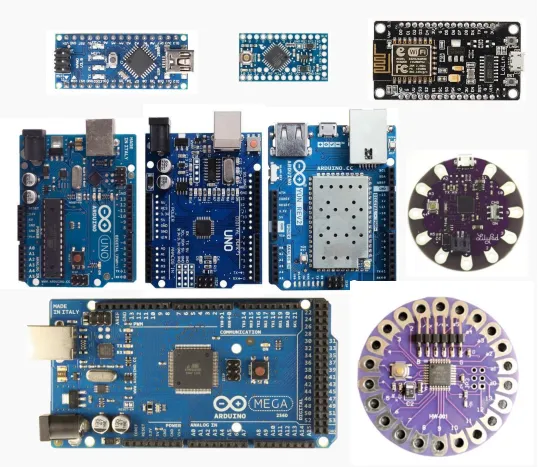
Arduino Development Boards
An Arduino development board is a versatile electronics platform with a microcontroller unit (MCU), I/O pins, and an intuitive integrated development environment (IDE). It's widely used for prototyping and building interactive projects, from robotics to IoT applications. Arduino's open-source nature fosters a vibrant community of developers, making it accessible for beginners and powerful for advanced users. Its affordability and ease of use make it a popular choice for electronics e
Key Components of Arduino
1. Microcontroller
The microcontroller is the heart of the Arduino board. It processes instructions and interacts with other components to execute your program's logic.
2. Input/Output Pins
Arduino boards have pins to which you can connect various components. Digital pins can be used for on/off operations, while analog pins can handle a range of values.
3. Power Supply
Arduino boards can be powered via USB, battery, or an external power source. The power supply provides the necessary voltage to run the board and connected components.
How Arduino Works
- Writing Code: You write code using the Arduino Integrated Development Environment (IDE), which is based on the C/C++ programming language.
- Uploading Code: Once you've written your code, you upload it to the Arduino board through a USB cable. The code is stored in the microcontroller's memory.
- Execution: The microcontroller executes the code, interacting with connected components based on the program's instructions.
Getting Started with Arduino
1. Obtain an Arduino Board
Purchase an Arduino board - Arduino Uno is a popular choice for beginners due to its simplicity and widespread use.
2. Install Arduino IDE
Download and install the Arduino IDE from the official website. This is where you'll write, compile, and upload your code.

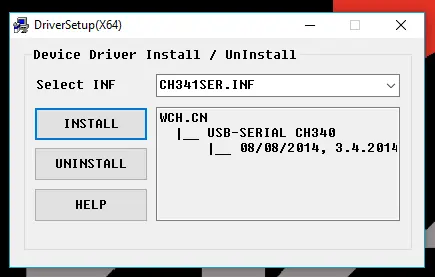
3. Install CH34x series
Download and install the CH34x series USB to serial converter from the official website. The CH34x series USB to serial converters are popular for connecting microcontrollers to a computer via USB. These converters allow microcontrollers to communicate with a computer, facilitating programming and data transfer.
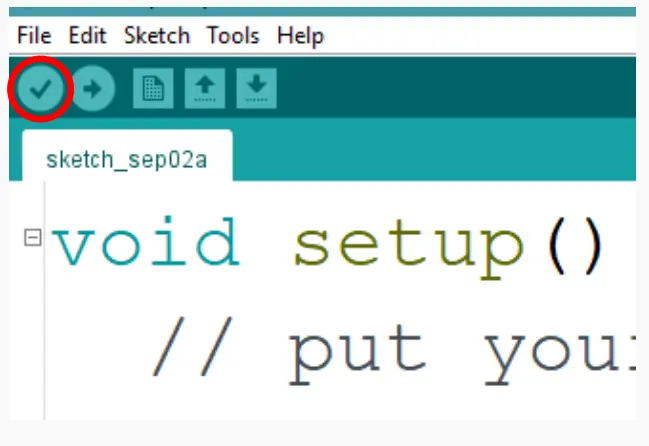
4. Arduino - Verify
The verify icon in the Arduino IDE is a checkmark symbol located in the upper-left corner of the interface. Clicking this icon initiates the code verification process, which checks for syntax errors and compiles the Arduino sketch. A successful verification indicates that the code is ready to be uploaded to an Arduino board for execution.
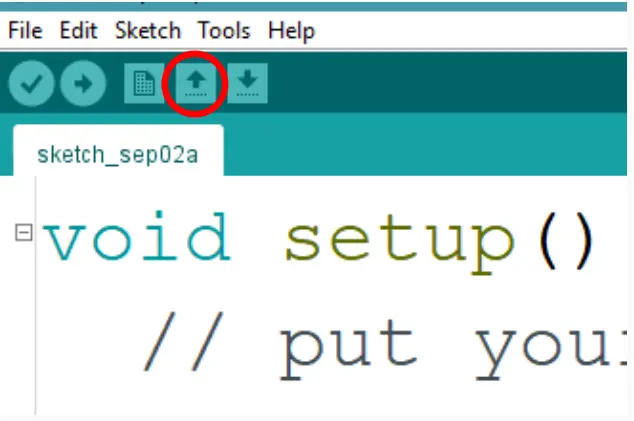
5. Arduino - Upload
The upload icon in the Arduino IDE is represented by a rightarrow symbol located next to the verify icon. Clicking this icon compiles the Arduino sketch and then uploads it to the connected Arduino board, allowing the code to run on the hardware. It's a crucial step in the development process for deploying code onto an Arduino device.
6. Arduino - New Sketch
The new sketch icon in the Arduino IDE is typically a blank document or a blank sheet symbol. Clicking this icon creates a new, empty Arduino sketch where you can write and develop your code. It's the starting point for creating a fresh Arduino project within the IDE

7. Arduino - Open
The Open icon in the Arduino IDE usually resembles a folder or a document with an arrow pointing upwards. Clicking this icon allows users to open existing Arduino sketches or project files stored on their computer. It's a convenient way to access and edit previously created Arduino code within the IDE interface.
8. Arduino - Save
The Save icon represented by an arrow pointing inwards towards a document or diskette. Clicking this icon allows users to save their current Arduino sketch or project to their computer's storage. It's a common symbol for saving data across various software applications.

9. Select Board
In the Arduino IDE menu, go to Tools → Board. A list of supported boards will appear.Then choose Arduino Nano Board
10. Select the Port:
- Go to the Tools menu again.
- From the Port submenu, you'll see a list of available serial ports.
- Look for the port with the name COM3.
The port will usually have a name like COM3 (Windows) or /dev/ttyACM0 (Linux). The actual port name may vary based on your operating system.
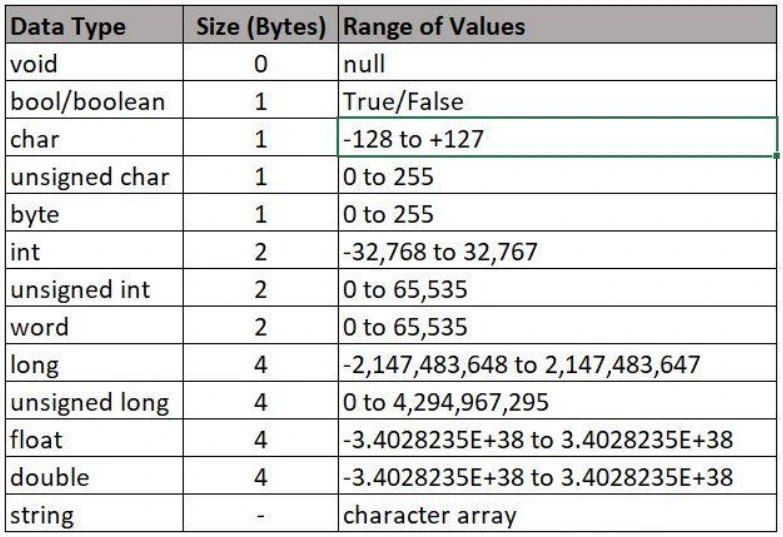
11. Arduino - Variable
A variable serves as a designated storage location within a program, comprising a name for identification, a specific data value, and a defined data type that determines the kind of information it can hold, making it a fundamental element for data management and manipulation in programming
12. Initialize | Write Your First Program
The provided line of code initializes a variable named device of data type int and assigns it the value 6. Let's break down the line and explain each part:
- int: This is a keyword in programming that defines a variable to be of integer data type. An integer is a whole number without a decimal point.
- device:This is the name of the variable being declared. In this case, it's named "device," but you can choose any valid variable name.
- 6: This is the value being assigned to the variable device. In this case, it's the integer 6.
int device = 6;
13. Basic Programming | Setup
In Arduino programming, the setup() function is a special function that is called once when the Arduino board is powered on or reset. It is primarily used for initialization and setup tasks before the main program starts running.
void setup()
{
pinMode(device, OUTPUT);
}
void setup():
- This is the definition of the setup() function. In Arduino, void indicates that this function does not return any value.
- The setup() function is a required function in an Arduino sketch and is executed once at the beginning of the program.
pinMode:
- This line sets the mode of a pin on the Arduino board using the pinMode() function.
- The pinMode() function configures a specified pin to behave as an INPUT or OUTPUT.
- In this case, it sets the pin specified by the variable device to be an OUTPUT pin, allowing you to send signals or control external components connected to that pin.
device:
- device is a variable that represents a pin number on the Arduino board.
- The value of device is previously initialized to 6, as per the provided context.
14. Basic Programming | Loop
The provided code is part of the loop() function in Arduino programming. Let's break it down step by step:
void loop()
{
digitalWrite(device, HIGH);
}
void loop():
- This is the definition of the loop() function in Arduino. The loop() function is a required function in an Arduino sketch.
- The loop() function contains the main code that runs repeatedly after the setup() function.
digitalWrite(device, HIGH)
- This line of code is using the digitalWrite() function to set the specified pin to a HIGH voltage level.
- The digitalWrite() function is used to write a HIGH or LOW value (representing a digital signal) to a specified pin on the Arduino board.
- In this case, the pin specified by the variable device (which is previously initialized to 6, as per the provided context) is set to a HIGH state.
device:
- device is a variable that represents a pin number on the Arduino board.
- The value of device is previously initialized to 6, as per the provided context.
15. Basic Programming | Digital Output ON
he provided Arduino code initializes a variable named device with a value of 6. It sets up pin 6 (or any pin specified by the device variable) as an OUTPUT using pinMode in the setup() function. In the loop() function, it continually sets the specified pin (pin 6, in this case) to a HIGH state using digitalWrite(), which means it's turning the output on.
int device = 6;
void setup()
{
pinMode (device, OUTPUT);
}
void loop()
{
digitalWrite (device, HIGH);
}
16. Basic Programming | Digital Output OFF
The provided Arduino code configures a pin (pin 6, specified by the variable device) as an OUTPUT and sets that pin to a LOW state in the loop() function. This action turns off any device connected to that pin.
int device = 6;
void setup()
{
pinMode (device, OUTPUT);
}
void loop()
{
digitalWrite (device, LOW);
}
17. Basic Programming | Analog Output Value
The provided Arduino code sets up pin 6 (specified by the device variable) as an OUTPUT and uses the analogWrite() function to output an analog signal with a value of 120 to that pin in the loop() function.
int device = 6;
void setup()
{
pinMode (device, OUTPUT);
}
void loop()
{
analogWrite (device, 120); // 0 - 255}
18. Basic Programming | Analog Input
The provided Arduino code configures an analog pin (A0) for reading analog input, reads the analog input from that pin, and prints the read value to the serial monitor.
int pin = A0;
int val = 0;
void setup()
{
Serial.begin(9600);
pinMode(pin, INPUT);
}
void loop()
{
val = analogRead(pin);
Serial.println(val);
}
19. Basic Programming | Analog Input
The provided Arduino code configures a digital pin (pin 6) for reading digital input and prints the read value to the serial monitor.
int pin = 6;
int val = 0;
void setup()
{
Serial.begin(9600);
pinMode(pin, INPUT);
}
void loop()
{
val = digitalRead(pin);
Serial.println(val);
}
The Arduino Community and Resources
Arduino has a vibrant and helpful community. If you encounter challenges or have questions, the Arduino Forum is a great place to seek assistance. Additionally, numerous online tutorials, YouTube channels, and books provide a wealth of information and project ideas.
Conclusion
Starting with Arduino is an exciting journey into the world of electronics and programming. The possibilities are endless, and with a bit of experimentation and learning, you'll soon be creating amazing projects of your own. Don't hesitate to dive in and start tinkering with your Arduino board! Happy making!